
Efficient Heating Solutions
Install Baseboard Heaters with Hot Water
Discover how to effectively install baseboard heaters using hot water for a cozy and energy-efficient home.
Energy Efficient
Easy Installation
Cost Effective
Reliable Performance
Step-by-Step Installation Guide
1
Step 1: Prepare the Area
2
Step 2: Install the Heater
3
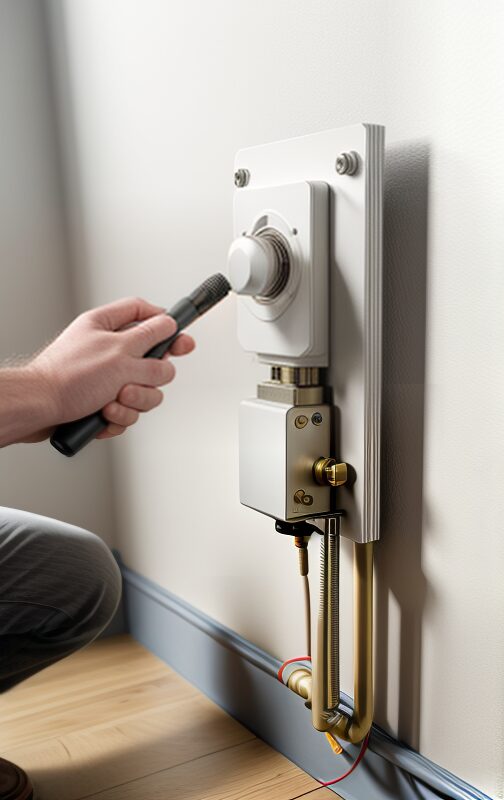
Step 3: Connect the Plumbing
Key Features of Hot Water Baseboard Heaters
Explore the advantages of using hot water baseboard heaters in your home.
Consistent Heating
Provides uniform heat distribution throughout the room.
Low Maintenance
Requires minimal upkeep, saving you time and effort.
Energy Savings
Reduces energy consumption, leading to lower utility bills.
Quiet Operation
Operates silently, ensuring a peaceful environment.
Common Questions About Installing Hot Water Baseboard Heaters
What tools do I need to install a hot water baseboard heater?
You will need a pipe cutter, wrench, screwdriver, level, measuring tape, and safety gear. Additionally, ensure you have the heater unit, mounting brackets, and necessary piping.
How do I bleed air from the system?
To bleed air from the system, locate the bleeder valve on the heater. Use a radiator key or screwdriver to open the valve until water starts to flow steadily, then close it.
Can I install the heater myself, or do I need a professional?
While it is possible to install a hot water baseboard heater yourself if you have plumbing experience, it is recommended to hire a professional to ensure proper installation and safety.
How do I maintain my hot water baseboard heater?
Regular maintenance includes checking for leaks, ensuring the system is free of air, cleaning the fins, and inspecting the boiler and piping for any signs of wear or damage.
What are the benefits of hot water baseboard heaters?
Hot water baseboard heaters provide even heating, are energy-efficient, and operate quietly. They also have a long lifespan and require minimal maintenance.
Watch Our Installation Tutorial
Follow along with our step-by-step video tutorial to learn how to install a hot water baseboard heater in your home. This comprehensive guide covers everything from preparation to final adjustments.
Read More…..
You may have finally decided to invest in a baseboard heater hot water system. But then, How to install baseboard heaters hot water safely and correctly! There could be genuine safety concerns in your mind concerning your baseboard hot water heater.
It is something that you need to research and be aware of. You will require technical skills to install the system properly.
The installation process does require expert guidance, precise instructions, and lots of practice. Hence, you can leave the installation process to the industry experts.
Why do You Need to Install Baseboard Heaters Hot Water?
Investing in one does allow you to derive the following benefits.
- Energy-efficient: They are economical and energy-efficient.
- Saves precious money: This heater type is more affordable when compared to radiant heating system installation costs. However, the expense involved is based on various factors. It includes the heater model selected, boiler type, room size, etc. Although its initial cost is much higher, being energy-efficient, you can save money with time.
- No toxic substances are emitted.
- It is easy to install when compared to under-floor heating.
- It offers consistent warmth. The boiler ensures water remains at a consistent temperature always.
Guide On How to Install Baseboard Heaters Hot Water?
Most homeowners find it difficult to undertake the process of installing the baseboard heater hot water system by themselves. This is because of its complex nature and requiring correct installation to ensure proper functioning.
But with some basic technical know-how from the industry experts, you can try to install it without professional assistance. However, try to avoid making serious, costly damages.
Steps to Follow Are:
- Determine heater location: Walls are the best place to install them. The place should be free from big furniture pieces.
- Identifying studs: This is the next step you are to find out in the wall. For this, you may invest in a study finder. On locating the studs, measure each stud’s dimension using a pencil.
- Face Plate extraction: A faceplate is generally attached to the baseboard heater. Extraction is essential to reach screw mounting holes present at the heater’s posterior end.
- The heater is to be aligned in a manner that its screw holes align in a similar plane like that of the wall studs. Arrange the holes in a line with wall studs. Then mount the baseboard heater onto the desired position. It should be done in a manner that one screw supports every foot.
- Output, Input Pipe: Note the output and input pipe’s correct positioning using a pencil. Use 1” saw to create a hole in the positions of those two pipes.
- Install heater onto the desired location: It is perhaps the last step that you need to follow. This is to ensure that the baseboard heater is fit into its place correctly and properly. To secure screws into place, use 2” drywall. It will be wise to directly install the screws into wall studs as it offers heightened support.
But before you try to undertake this DIY task,
Especially for something that is electrical-based, take adequate precautions to be safe. At the circuit board, turn off the power. After installation, test the heater to ensure it is working as it is meant to be.
For the next few days, keep a tab on its overall functioning. If it works fine, then the installation job is done perfectly.
In case you notice some sound arising from it or other issues, then it is better to immediately call the industry experts. With their expertise and sophisticated tools, they will identify the issue and fix it quickly.
Conclusion
Before making the purchase, find out if baseboard heater hot water systems are the appropriate solution to meet your requirements at home.
Get to know how it functions, its pros & cons as well as the installation process. You can go ahead and install the system by yourself without professional assistance. For this, you need to be confident in your DIY skills and have some knowledge of electrical work. Also will be required appropriate tools.
What Our Customers Are Saying
John D.
Sarah L.
Mike R.
Ready to Upgrade Your Heating System?
Don’t wait any longer to enhance your home’s comfort. Whether you’re looking to purchase top-quality baseboard heaters or need professional installation services, we’re here to help. Take the next step towards a warmer home today!